Home

Seafood and Veggies Tempura

A Japanese dish consisting of battered and deep fried seafood and vegetables which is a family favourite aside from the famed sushi rolls.

Biko with a Twist

A Filipino sweet rice delicacy with an added twist -- leche flan on top instead of the usual caramel

Sweet and Sour Pork

A nice blend of sour and sweet to a marinated pork cubes will surely make you crave for more... a delish you can not say no!

Szechuan Beef Stir Fry

A no non-sense beef dish with 7 flavours present -- sour, pungent, hot, sweet, bitter, aromatic and salty

Turbo Roast Chicken in Soy, Lemon and Herbs

A recent favourite of my foodblog followers...the mixture of various herbs, lemon and soy makes this dish a great treat for no fuss cooks and eaters

Showing posts with label Pinoy Food. Show all posts

Thursday, July 5, 2012

Easy Pan de Coco

Pan de Coco has always been a favourite of many Filipinos.  It brings back a lot of memories to most people.  It's like going back to childhood when you were walking to your school and stop at a small store to buy your baon which would usually be a pan de coco or a simple monay.  Either one would make your tummy filled up just until it's time for you to go home again to eat lunch.

Ingredients
Choose any of the recipe for dough.
beaten egg for glazing
Filling
dessicated coconut
coco jam (Lily's)

Procedure
Divide the dough into balls ( to the size that you prefer).  Roll each ball making sure that the center is thicker than the edges.
Sprinkle the center with dessicated coconut.
Top the coconut with 1 tsp of coco jam.
Sprinkle the coco jam with dessicated coconut.
Gather the edges of the dough and seal together by pinching.
Place them in a lightly greased pan with the sealed side at the bottom.
Make some holes using fork.
Let them rest for 1 hour.
Glaze with beaten egg.
Bake for 15 minutes in a 180C preheated oven.  The length of baking time would depend on the size of your pan de coco.  Remove  from oven when they become shiny golden brown on top.

A comment or two will be appreciated...

Monday, July 2, 2012

Pinoy Polvoron

Who would not love eating polvoron?  When I was still in the Primary School, I would always buy them in a store near the school.  They were always wrapped in colorful plastics.  Flavours could be pinipig and peanuts.  Today, you can even buy them commercially at Goldilocks with flavours like oreos and cashews.  Polvoron is of Spanish origin (wikipedia).  Polvo (pulbo) is a Spanish term for powder.  The original Spanish polvoron is a flaky, soft, rich, shortbread-type cookie made with flour, lard or vegetable shortening, powdered sugar and cinnamon.  The mixture is molded into oval or round shapes with a polvorera (a special mold which allows the formed sweets to be discharged easily without crumbling). Once molded, polvoron is wrapped in cellophane or Japanese paper. Like I said, the ones that we have in the Philippines has so many variations-- thanks to the creative Filipinos!

Ingredients
1 1/2 c powder milk
1 c plain flour
1/2 tsp salt
1 c butter, melted
1/2 c peanuts or any nuts that you like or you can add crashed oreos (just remove the cream first)

Procedure
Toast the flour in a wok until it becomes light in color.  Keep on stiring so as not to have a burnt flour.
Remove the flour from fire.
While waiting for the flour to cool a bit, sift powder, salt and salt in a big bowl.
Melt the butter in the microwave.
Mix the all the dry ingredients together (including the flour and nuts or oreos).
Put in the butter.
Use your hands in mixing them well.
Use a polvoron molder in molding the polvoron.  If you do not have one, just use your muffin pan or cookie cutter (just make sure that the polvoron is well compact and solid).
Wrap with individual plastics or japanese paper.  You can also just keep them in an airtight container even without wrapping them.
Refrigerate before eating.

A comment or two will be appreciated...

Wednesday, June 27, 2012

The Controversial Pan de Regla

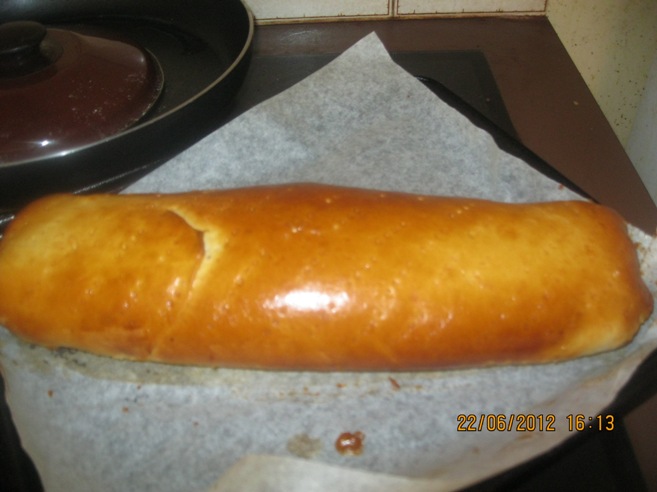
When I posted in Facebook that I was baking Pan de Regla, I received comments immediately!  Some were curious and intrigued and the others started remembering what this bread is.  It's amazing to read their reactions to the name of this bread.  They began searching for pics and one of my friends and a former collegue even posted them on her FB wall.  They also shared the bread's different names --- kalihim, kabukiran, pan de pula, ligaya, floorwax etc.

When my husband asked what is the meaning of the name, I had to explain it hehehe...he said "of all the names, why that? yuuuck!" But what's in a name anyway?  As long as it tastes good, that's the important thing...and my husband proved it true...because he was the one who ate most of the bread.

Ingredients
no. 3 basic dough recipe
1 egg beaten for glace
Filling
7 pcs stale bread (edges removed)
1 1/2 c fresh milk
2 - 3 eggs
1/2 c granulated sugar
2 tsp vanilla
food color

Procedure
While the dough is set aside, start preparing the filling.
Pour in the milk in a bowl. 
Add in the rest of the ingredients (except bread and food color) and mix.
Add in the bread (just shred using your hands) and make sure that they absorbed the liquid.
If you have a food processor, puree the filling there. 
If you're using a blender, you need to use a colander with bigger holes to remove the tough bread.
You can also use your electric mixer and then use colander afterwards.
Transfer into a non stick pot and add the food color (half a teaspoon will do or you can add more if you want).
Put the stove on a low fire and keep stiring the filling mixture until it becomes thick.
Let it cool for a bit.
Transfer the filling in a cling wrap (length size of a ruler or a foot). 
Roll the filling and seal the cling wrap.
Refrigerate for until it sets.

Assembly
Roll out the dough (about 2 inches longer than the rolled filling).

Place the rolled filling in the middle of the flattened dough.
Fold the shorter sides of the dough.
Fold the longer sides of the dough towards the top covering the filling.
Seal with beaten egg.


Use a fork in making holes in the dough.


Brush with the beaten egg on both sides.
Place in a pan with the folded sides on the bottom.
Bake for 35 minutes in 180C or until the top looks like this.

A comment or two will be appreciated...

Thursday, June 21, 2012

Humba

One dish that my father would love to cook if he's still around is humbang pata ng baboy or carabeef that we buy in Malolos Market at the early hours of the morning so as not to lose the chance of buying the last piece.  My father would always tell me to buy the unahan or the front hock not the hind ones since the first has most of the meat than the latter.  I was always amazed on how he would gently and patiently tenderise the meat without using the pressure cooker.  He was indeed a good cook.  I hope he is proud that I turned out to have the same passion in cooking.  How I miss him...

Humba or Umba may have originated in the Visayas is a braised pork with sugar.  The best pork cut touse in this kind of dish would be those with fats like hocks and belly as they add more flavour to the the humba. 

Anyway, enjoy this wonderful dish that will certainly take your palate to another world when the meat and fat melt in your mouth with the burst of the delicious flavour.

Ingredients
1 pork hock (pata ng baboy)
6  pcs bay leaf
6 cloves, chopped
2 large onions, chopped
1 1/2 c pineapple juice
2 tbsp peppercorns
2 tbsp kikkoman soy sauce
3 tbsp white vinegar
2 tbsp brown sugar
5 pcs or more, banana blossoms
salt and pepper to taste

Procedure
Boil the pork hock for 2 hours in water with 1 tbsp peppercorns, 3 pcs bay leaf , salt and pepper to taste.  Remove from fire when the meat is almost detached from the bones.
Heat oil in a non stick pan.
Sear the meat.  Remove from pan.
Sautee onions and garlic in the same pan.
Add in the remaining bay leaf and peppercorns.
Put back the meat.  Stir and let the meat absorb the flavour from the bay leaf, peppercorn, onions and garlic.  Put on low fire.
Pour in the pineapple juice.
Put in sugar and soy sauce.  Boil for at least 2 minutes.
Add in the vinegar.  Do not stir. 
Add in the banana blossoms and simmer until the juice has evaporated a bit.
Remove from fire.
Pour in the
A comment or two will be appreciated...

Monday, June 18, 2012

Ginataang Pakpak at Atay ng Manok (Chicken Wings and Liver Braised in Coconut Cream)

I have always loved coconut cream in my dish.  The aromatic flavour coming from it just makes me hungry.  They say the best meat that would really absorb this wonderful flavour would be chicken.  I have proven it true in this dish.  You can really taste the coconut cream in the chicken meat.  The herbs that I have added as an experiment worked wonderful with them too.

Ingredients
1/2 K chicken wings (tips removed)
1/2 K chicken liver
2 c coconut cream (kakang gata)
4 cloves of garlic, minced
1 medium onion, minced
1 chicken broth cube
1 ginisa mix
1 tsp sweet basil
1 tsp paprika
1 tsp chili powder or use the fresh ones
1 tsp powdered ginger or fresh ginger
2 c fresh spinach (or malunggay leaves)
2 tbsp fish sauce
1/2 c water
salt and pepper to taste.

Procedure
Marinate the chicken wings with fish sauce for 15 minutes.
Sear the chicken wings.  Remove from pan.
Sautee onions and garlic.
Add in cube and ginisa mix.  Stir.
Add in the basil, paprika and ginger.
Put in the chicken wings.  Stir.
Put in the chicken.
Add in the liver.  Do not stir.
Pour in the water. 
Add in salt, pepper, and chili powder.
Boil until meat and liver are tender.
Pour in the coconut cream.  Simmer for 5 - 10 minutes.

A comment or two will be appreciated...

Monday, June 4, 2012

Beef Lumpiang Togue (Beef and Bean Sprouts Spring Rolls)

Normally in making lumpiang toge, pork meat is added.  This time I made my own recipe using beef instead of pork.  I have also added chicken broth cube and ginisa mix to enhance the flavour.  This has alwasy been my favourite since I was still a kid.  There would not be a Sunday when I would not buy this at that vendor near the trike waiting area.  They were really quite yummy. 

I have cooked this dish before but experimenting with my other recipe but my husband prefers this one though as the taste is better (which I definitely agree with). 

Ingredients
1/3 K beef, cubed and then cut thinly
1/2 c small prawns or shrimps
3 cloves garlic, minced
1 medium size onion, minced
2 c bean sprouts
1 small potato, cut into small cubes
1 medium carrot, cut into matchstick size
1/2 c green beens, cut diagonally but small size
1 chicken broth cube
1 ginisa mix
2 tbsp kikkoman soy sauce
salt and pepper to taste

Procedure
Sear the beef just until a bit brown.  Remove from pan.
Sautee onions and garlic.  Put the beef back to the pan.
Add the chicken broth cube, ginisa mix, soy sauce and salt and pepper.  Stir for 3 minutes.
Put in the veggies.  Stir.  Add 1/4 c of water.
Simmer for 5 minutes.
Remove from pan and wrap in your spring roll wrappers.
I was able to make 20 pieces of spring rolls using this recipe.

A comment or two will be appreciated...

Tuesday, May 29, 2012

Beef Asado (Family Recipe)

This recipe was hand down to me by my Nanang Osang + (a spinster grandaunt).  She taught me how to cook this way back when I was still in the elementary school.  She's one strict lady who really loved food to the max level!

In this dish however I had to use things that are available in my kitchen.  I cannot find calamansi or calamunding here in Australia so I had to use the juice of one lemon + vinegar.  Use your taste buds in balancing the taste closer to the taste of the soy sauce - calamansi mixture.  I had discovered that if you mix lemon and vinegar and then add them to the soy sauce the taste would be good.
Our original recipe also uses chicken breast (white meat part) and the legs.  The meat, potatoes and carrots are not cut too.  They are only sliced after they are cooked. The sauce will also be poured onto the serving plate.  I could have done the original way but having two little toddlers around me wouldn't give me much time so for the purpose of cutting back time, I did it the short cut way.

Ingredients
1/2 k beef round, cut into pieces
1 large potato, quartered
1 large carrot, cut into pieces
1 large onions, minced
5 medium onions, whole
1 tin tomato sauce or 4 tbsp tomato paste dissolved in 6 tbsp water
1 tbsp garlic, minced 
1 red capcicum, sliced diagonally
1/4 c soy sauce (I used marca pina)
juice of one lemon
2 tbsp  white vinegar

Procedure
Marinate beef, potatoes, carrots,  and medium whol onions in the soy sauce - vinegar - lemon mixture for at least 15 minutes.
Fry the potatoes and carrots first before the beef to avoid the pan having too much fat.  Fry just until about cooked.
Remove from pan and drain excess oil.
In another pan, heat 2 tbsp of oil from the the other frying pan.  Sautee onions and garlic.
Put in the meat, carrots, onions and potatoes.
Pour in the marinade mixture.  Add half a cup of water.  Boil until meat is tender.  You can always add a bit of water if you want but just make sure that you do not over dillute it.
Pour in the tomato sauce or paste - water mixture onto the pan.  Simmer for 10 minutes.
Serve hot.

A comment or two will be appreciated...

Monday, May 28, 2012

Nilagang Pata ng Baboy (Pork Hock Stew)

I don't know which one I like better --- Beef or Pork Nilaga but all I can say is I love them both! Hehe.  Beef has a strong taste and would be more lovely if you add the fats to it when you cook your nilaga.  Pork Pata is also wonderful especially if the pork fats would be really cook for a number of hours that when you eat them, they just melt in your mouth.  I know both are bad for your health especially if you have a problem with your blood pressure but they're just so tempting to eat :).

I have already posted Nilagang Beef recipe so I will just add a bit this time.

Make sure that you get the front pork hock because it has more meat.
Ask your butcher to cut the pork hock into at least 5 pieces.  Boil them in a salted water for at least 3 hours ( I boiled mine for 4 hours) or until the fats and skins are alsmost off the bones.
Then follow the recipe for Nilagang Beef.

A comment or two will be appreciated...

Friday, May 25, 2012

Ginisang Ampalaya (Sauteed Bittergourd or Bitter melon)

Not too many people loves ampalaya because of its strong bitter taste. This is quite good for treatment of gastrointestinal diseases.    Researchers at Saint Louis University claim an extract from bitter melon, commonly eaten and known as karela in India, causes a chain of events which helps to kill breast cancer cells and prevents them from multiplying. 

I remember my father teaching me the right way to remove a bit of the bitter taste of bitter gourd.  He would often sliced them thinly in diagonal shapes.  He would pour tepid salt and water mixture and squeeze out the bitter taste from them...but he would always tell us not to over-squeeze so there would be a bit of bitter taste still.  My husband hasn't had this before so when I came to Australia and I chanced upon ampalaya in one of the shops, I grabbed a couple and cooked them.  He did love them and I am so happy about it.  Now, I am teaching my daughters to eat them too. 

Ingredients
2 medium size ampalaya,sliced diagonally
2 tomatoes, diced
2 eggs
1/2 tbsp garlic, minced
1 medium onion, minced
1/2 packet ginisa mix
1 chicken or pork or shrimp boullion cube
salt to taste

Procedure
Remove a bit of the bitterness of the ampalaya by pouring a tepid water in a bowl.  Add salt. Place the ampalaya in this mixture and squeeze a bit.  Remove the water-salt mixture.
Sautee onions, garlic and add in the ampalaya.  Put in the ginisa mix.  Do not stir too much. 
Pour in 1/2 c of water. Add in the cube.
Simmer.
Add in the eggs and stir a bit.


A comment or two will be appreciated...

Saturday, May 19, 2012

My Creamy and Spicy Adobong Ribs sa Gata

This is the second of my adobo series.  I know it took a long time to follow the last one but I think it's worth the wait for this recipe would really make your palate happy.

This is my recipe for adobong pork ribs with gata or coconut milk.  The taste is just soooo yummy!  you can taste all the important flavors  in a dish and everything is balanced by the coconut milk.  It also made the dish creamy.
Ingredients
1/2 k pork ribs
4 tbsp white vinegar (Datu Puti w/ chilis, onions and garlic)
1 tbsp worcestershire sauce (Leah Perrins)
1 tbsp rice wine vinegar
1 tsp Maggie savour
2 tbsp soy sauce (Marca Pina)
1 tbsp garlic, minced (for marinade)
1 tbsp garlic, minced (for sauteeing)
1 onion, chopped
1/2 tsp coriander
1/2 tsp sweet basil
1/2 tsp pepper
2 pcs green chilis or jalapenos
2 pcs bay leaf
1/4 c water
salt to taste (optional)
1 cup coconut milk
hardboiled eggs

Procedure
Marinate the ribs with soy sauce, worcestershire sauce, soy sauce, rice wine vinegar, white vinegar, maggie savour, garlic, pepper, coriander and bay leaf for 30 minutes.
Heat a pan.  Sear ribs in olive oil. Remove from pan when the ribs turn into slightly brown color.
Sautee onions and garlic. 
Put in ribs into the pan and stir.
Pour in the chilis, marinade and water.
Add salt if you want or additional pepper.
Put in the sweet basil and eggs.
Boil until the meat is cooked.
Pour in the coconut milk and simmer for 3 minutes.

A comment or two will be appreciated...

Tuesday, May 15, 2012

Ginataang Bilo-bilo

I have always loved ginataan especially with lots of bilo-bilo on it.  Bilo-bilo are riceballs made from glutinous rice flour and shaped into small balls.  It's so easy to know if they are cooked.  When they start to float on the pot, that means they're ready.  Ginataan is a favorite snack of the Filipinos.  Most of the karinderias (small food stalls) serve it.  It is best to eat ginataan when it's warm and the weather is cool.  The sweetness and the yummy flavor of the coconut cream or milk add more yumminess to it.
My taste tester (my husband) loved it  and had second helpings.  He said, it's different.  Gee it's his first time to have it.

Ingredients
4 saba (plantain or lady fingers), sliced
1 1/2 c glutinous rice flour + 1 c water
1 big sweet potato, cubed
1 big taro (gabi), cubed
1 c jackfruit, sliced
1 c sago or tapioca pearls ( I used McKenzies small tapioca pearls)
2 tin coconut cream
1 c white sugar

Procedure
Prepare the bilo-bilo.  Mix the rice flour with water and form bilo bilo.  Set aside.
Boil sago with 1 c water w/ 1 c sugar.
Keep stiring until they float or until they become bigger in size.
Pour in 1 tin of coconut  cream.
Add in the sweet potato and taro.  When they are a bit tender, add in the bilo-bilo, bananas and jackfruit.
If you are using the jackfruit in jar, pour 1/2 c of its juice to the ginataan.
Simmer and add the other tin of coconut cream.
Serve hot or chilled.
A comment or two will be appreciated...

Thursday, May 10, 2012

Pininyahang Manok

An old family recipe that has been present in many occasions in our home in Bulacan.  My husband calls this dish Chicken Aloha because of the pineapple pieces added to it.  Normally, I would add vienna sausage (Phillips brand) whenever I cook this dish.  I would also include its juice since it adds more taste to the dish.  However, I had to use the ordinary hotdogs because I forgot to grab some from the Asian store in Toowoomba.  The taste is slightly different because of this but still it tastes delicious. 

Ingredients
1 k chicken (any part)
1 c evaporated milk
1 medium onion, diced
1 tsp garlic, minced
8 pcs hotdogs, sliced (or vienna sausage)
1 chicken broth cube
1 300 g tin pineapples, sliced
fish sauce to taste
pepper to taste (optional)

Procedure
Marinate chicken with fish sauce.
Sear chicken on a heated pan.
Remove chicken from pan.
Sautee onions and garlic.
Put back the chicken to the pan.  Stir.
Add in the hotdogs.
Pour 1/2 c water and boil.  Make sure that chicken is cooked.
Let the water evaporates. 
Put in the pinapples with the juice.
Boil.
Add the milk. Simmer for 2 minutes.
Serve.
A comment or two will be appreciated...

Menudo

Menudo is a celebratory dish.  Feast, birthdays, graduations, and weddings would alway have menudo at the table.  Although this dish was brought to the Philippines by the Spaniards, it is of Mexican origin.  It is a traditional Mexican dish made of beef with clear broth or with a red chili base (wikipedia).  It is said that it is prepared by the entire family where everyone has his/her own part to do.  It is interesting to note that the cooking menudo itself is a way of socializing and uniting the whole clan or family in the Mexican culture.  I can say that it's the same thing for the Filipinos and  I hope that most of us are still doing this.

Ingredients
3/4 k pork cubes
1/3 k pork liver, cubed
1 c red capcicum, cubed
3 medium carrots, cubed
2 big potatoes, cubed
1 tin chickpeas (garbanzos)
8 pieces hotdogs, sliced diagonally
1 c tomato sauce (pinoy style)
1 tin reno liver spread (big one)
4 tomatoes, diced
1 medium onions, diced
1 tbsp garlic, minced
10 pcs calamansi
1/3 c soy sauce

Procedure
Marinate pork and liver with soy sauce and calamansi juice.
Sautee onions, garlic, and tomatoes.
Put in pork and liver.
Add in hotdogs.
Add in the carrots and potatoes.  
Pour 1/2 c water and the marinade and boil.
When the meat is tender, add in the liver spread and chickpeas.
Pour in the tomato sauce and simmer.

A comment or two will be appreciated...

Wednesday, May 9, 2012

Vanilla Puto (flour base)

This is my second puto recipe.  This time I am using vanilla as flavoring and plain flour.  Instead of steaming I baked the puto.  The result was just as yummy as my first puto.  I could have made a puto out of rice but having two daughters at home take too much of my time.  Hopefully next time I can make those puto made of rice flour.

Ingredients
4 c plain flour
2 c white or brown sugar
2 tbsp baking powder
1 tbsp vanilla
1 tsp salt
1/2 c butter, melted
1 c evaporated milk
2 1/2 water
2 eggs

Procedure
Sift together the dry ingredients.  Mix.
Make a well in the the center of the dry ingredients.
Put all the wet ingredient + eggs into the well.
Mix using wire whisk or electric mixer.
Pour the puto mix into a jug.
Grease muffin pans or prepare muffin cups.
Pour the batter -- 3/4 of the muffin pans or muffin cups.
Bake the puto in a preheated 180C oven for 13 - 15 minutes.

A comment or two will be appreciated...

Friday, May 4, 2012

Baked Oysters

Oysters are my favorite shellfish in the world.  Once I started eating them, I just can't seem to stop.  I remember my parents would always warn me about tummy aches whenever I eat  them..haha!  One thing I have learned from my father in cooking oysters is you don't really boil them with water.  Clean the oysters, place them in a bucket and then pour boiling water on them.  Remove the water and open the oysters with knife.  Dunk them literally in vinegar with coarsed milled peppercorns and dice onions.  Eat with rice oohhhhh soooo yummmmyyy!

You can also be a little "soysal" or elegant in eating oysters by baking them like the recipe below.  I have tried this before and gee soooo yummmy!  I am so glad to find one photo of this dish at  the FB album of Jen Cabacungan - Garcia.

Ingredients
oysters
garlic, minced
butter
grated cheese

Procedure
Open oysters and remove the top part of the shells.
Place the oysters in baking pan.
Put butter, grated cheese and garlic on top of each oyster.
Bake in a 175C preheated oven just until the cheese and butter melt.

A comment or two will be appreciated...

Pink Salmon Afritada

Another experiment that turned out really great!  To have a bit of rest from eating too much meat, why not use the tin fish in your pantry and cook up a wonderful dish?  I would have to love to cook the fresh salmon though but there's none in our freezer so the tin one will do.  I can also suggest that if you are feeling a bit lazy, you can also use the ready mix sauces available in the market.  This time though I did not use one. 

You can also experiment with any tin fish in your pantry -- tuna, whitings, etc

Happy cooking everyone!

Ingredients
1 tin pink salmon
1 tsp peppercorns
1 medium carrots, cubed small
1 medium onions, sliced thinly
1 tbsp garlic, minced
2 pcs bay leaf
1/3 c green peas
1/4 c red capcicum, cubed small
1/2 c tomato sauce
1 tsp paprika
salt and pepper to taste

Procedure
Sautee onions, and garlic.
Put in the peppercorns.
Add in the bay leaf, capcicum, carrots and green peas.
Put in the pink salmon with its juice.
Boil a bit.
Add in the paprika and tomato sauce.
Dillute with a bit of water.
Add salt and pepper.

A comment or two will be appreciated...

Thursday, May 3, 2012

Pinoy Style Ham and Cheese Quiche

This type of quiche is a bit different because I am not using a dough but stale white bread instead.  It saved me a lot of time kneading and mixing but with good result too.

The husband said, it's his first time to eat this type of quiche and he loved it!  I am so happy too that my youngest daughter loved it.  I can't say the same for my eldest daughter though because she was sleeping when we were eating the quiche so she was not able to have some.

Try this easy dish and I am sure your family will love it too!
Ingredients
8 pcs white bread
1/3 c green peas
1/3 c corn kernels
3 eggs
3/4 c milk
1/2 c ham, chopped into small pieces
1/2 c cheese, shredded
2 tsp parsley
salt and pepper to taste
olive oil or melted butter

Procedure
Remove the edges of the bread. Flatten using rolling pin. 
Brush the bread (both sides) with olive oil or butter
Press the bread onto the muffin pans.
Bake at preheated 180C oven for 10 minutes.
Prepare the filling while waiting for the bread to bake.
Whisk eggs with milk.  Add in the parsley, salt and pepper.
Remove the bread from the oven.  Reduce the oven temperature into 165C.
Divide the ham, cheese, corn kernels, green peas and cheese into the bread cups. 
Pour the egg-milk mixture onto the bread cups.
Bake for 10 - 15 minutes.

A comment or two will be appreciated...

Sunday, April 29, 2012

Cheat Way to Make Pandan Puto (rice cake)

How would you make puto pandan when you're not in the Philippines and not all the ingredients are available? Use the cheat way to do it!  Just grab yourself a Maya Puto Mix and pandan and presto!  You have your own puto pandan away from the Philippines.

Ingredients
1 packet of Maya Puto Mix
3/4 sugar
40 g butter, melted
1 c fresh milk or evaporated milk
1/2  tsp pandan paste
1 drop of green food color
1/2 c grated cheese
1 egg, beaten

Procedure
Put the puto mix in a bowl.
Add in all the dry ingredients except for the cheese.
Make a well in the middle.
Whisk in the butter, milk and egg.
Add in the pandan paste and food color. Mix well.
Grease a round pan or muffin moulds with butter.
Pour in the batter onto the moulds or pan.
Cover with foil.
Steam for 30 minutes from the time the water boils.
Top with grated cheese 10 minutes before the steaming time ends.
Cool a bit.
Spread butter or margarine on top.
A comment or two will be appreciated...

Saturday, April 28, 2012

Binagoongang Baboy w/ Zucchini

Binagoongang Baboy is of Philippine origin.  The main ingredient of the dish is pork flavored by bagoong or shrimp paste which is pungent for some people but heaven for Filipinos.  We don't usually cook this dish at home for the fear of having the blood pressure shoot up.  Most of the time we would only use bagoong for just a bit of flavoring for pakbet or just sauteed tiny bits of pieces of pork to use as dip for green mangoes or as an added yummy taste to vinegar dip for fried fish.

We would usually add eggplants and coconut milk when cooking this dish but this time I wanted to try if zucchini would work well with the pork and bagoong.  The result was really delicious...I guess all my taste buds worked --- sweet, spicy, sour, salty...sooo yummy!

Ingredients
4 pcs pork chops, cubed
4 zucchini
1 tbsp garlic, minced
4 cloves garlic, peeled and squashed
2 tsp peppercorns
1 onion, minced
2-3 tbsp Barrio Fiesta bagoong
1 green chili, chopped
2 pcs bay leaf
1/2 c white vinegar

Procedure
Boil pork cubes, bay leaf, garlic cloves, vinegar and peppercorns in water (just enough to cover meat).
Heat a pan with oil.
Sautee minced garlic and onions. 
Scoop out the meat and the other ingredients from the pot and add these things to the pan.
Add the zucchini
Stir in the bagoong.
Simmer.

A comment or two will be appreciated...
Thursday, April 26, 2012

Nanay's Lumpiang Shanghai

Lumpiang Shanghai or spring rolls are of Chinese origin.  They became popular in the Philippines during the Asian Trade era when the Chinese traders started settling in the Philippines.  The term lumpia, is of Hokien origin -- lunpia.  It is interesting to note that this spring roll dish is very popular too in other Southeast Asian countries and each has its own version. 

The one that we have in the Philippines is more on the meat side than the other ingredients.  Usually the size is around 4 - 6 inches long and deep fried.  Although those commercial ones are quite smaller and had more meat extender for profit sake.  Most restaurants serve this dish and now even those small stalls are making big profits from this wonderful dish.

It is also a celebratory dish since it is present at most important celebrations like birthdays and Christamas or New Year.  My family loves lumpiang shanghai...and even my husband's family fell in love with it.  It is always one of the list of requests of my hubby for lunch and dinner.

I am not sure if you the other Filipinos cook it the way our family does.  This recipe is the one I grew up with and it has been around for ages in our family.

Ingredients
1 k beef minced
3 large onions, minced
2 tbsp garlic, minced
6 medium carrots, minced
1/2 c spring onions, minced
1 tbsp parsley
1 tbsp maggie savour
fish sauce to taste
Spring roll wraps (about 40 pcs)

Procedure
Heat up a pan and pour a bit of oil on it.
Cook the meat over medium fire.
When the meat is cooked, move it to one side of the pan.
Sautee garlic and onions and mix in with the meat when the onions become transparent.
Add in the carrots, spring onions and parsley.
Pour in the maggie savour and fish sauce.  Stir.
Cook just until the sauce has evaporated a bit.
Remove from fire.
Place 2 tbsp of the meat mixture on the one corner of the spring roll wrap.  Fold that corner, covering the meat mixture.  Fold the two sides corner towards the center covering the first flap.  Then roll towards the remaining corner.
Deep fry until golden brown.
Serve with your favorite dip.

A comment or two will be appreciated...